

A Practical Guide to Building Scalable Frontend Applications with Next.js
A Practical Guide to Building Scalable Frontend Applications with Next.js
Learn how to build scalable frontend applications with Next.js using Server Components, caching, reusable components, state management, authentication, and performance best practices.
Frontend
August 30, 2026

Md. Moynol Hasan Ome
Frontend-focused software engineer specialized in Next.js, with a keen focus on building clean, intuitive interfaces for enterprise security and e-learning platforms. My expertise extends into complex UI workflows and full-stack integration, complemented by practical experience in backend services, deployment, and server configurations to ensure a seamless overall product experience.

Modern scalable frontend applications need to handle more data, more users, more interactivity, and faster performance than ever. As frontend engineers, we must build applications that scale, not only in performance, but also in maintainability, team collaboration, and long-term growth.
Next.js has become a popular choice for building scalable frontend applications. With features such as the App Router, React Server Components, caching and revalidation, Route Handlers, and flexible deployment options, it provides a strong foundation for building scalable, production-ready applications.
This guide walks through practical approaches to architecting scalable frontend applications with Next.js, using practical examples and patterns that can help teams build applications that grow with their products.
Why Choose Next.js for Scalable Frontend Applications?
Before diving into best practices, here are some reasons Next.js is well suited for scalable applications:
- Server Components can reduce the amount of JavaScript that needs to run in the browser.
- SSR, SSG, ISR, and other rendering capabilities provide different approaches for different application requirements.
- Built-in routing helps keep the codebase organized.
- Data fetching, caching, and revalidation provide control over how application data is retrieved and refreshed.
- Route Handlers and server-side capabilities can simplify certain application architectures, particularly for smaller applications.
- File-based conventions make large codebases easier for teams to navigate.
- Performance features such as image optimization, code splitting, and streaming provide useful foundations for production applications.
Now, let’s dive into how to design a scalable Next.js application.
1. Start With a Strong Folder Structure
A scalable application begins with a predictable, easy-to-navigate structure.
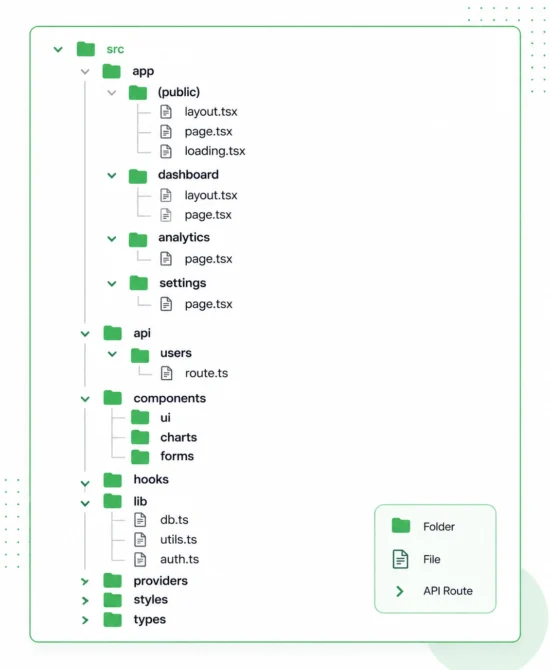
Tips
- Use app/ for routes when working with the App Router.
- Keep shared utilities inside lib/.
- Split components into clear domains such as ui, charts, tables, and forms.
- Use React Server Components by default and introduce Client Components when client-side functionality is required.
A consistent structure makes it easier for developers to understand the codebase and contribute as the application grows.
2. Use React Server Components to Reduce Bundle Size
One of Next.js’s biggest advantages is React Server Components (RSC).
Use Server Components for:
- Fetching data
- Server-side processing
- Rendering static content
- Non-interactive UI
Use Client Components when needed for:
- Forms
- Buttons with client-side interactions
- Charts
- Animations
- Interactive UI elements
Example
Server Component (default):

Client Component (only when required):

Using Server Components where appropriate can reduce the amount of JavaScript that needs to be sent to and executed in the browser. The goal is not to eliminate Client Components, but to use them where browser-side functionality is actually required.
3. Leverage Built-in Data Caching
Next.js provides caching and revalidation mechanisms that can help improve application performance.
The appropriate strategy depends on how fresh the data needs to be and which Next.js caching model your application uses.
Example
const data = await fetch("https://api.example.com/products", {
cache: "force-cache",
})
Types of caching you can use
Type | Purpose |
|---|---|
Cached data |
Reuse data according to the application's caching strategy |
cache: "no-store" |
Fetch fresh data for each request |
Revalidation |
Refresh cached data after a defined period |
For more details on caching and revalidation, see the Next.js caching and revalidation documentation
Use a caching strategy based on your data requirements
- Dashboard: May require fresh or frequently updated data.
- Marketing website: Can often use revalidation for content that does not change frequently.
- Product catalog: May benefit from caching when product data does not need to be updated on every request.
The key is to choose a caching strategy based on the freshness requirements of the data, rather than applying the same rule to every page.
Version note: Caching behavior has evolved across Next.js versions. Next.js 16 introduced the Cache Components model and additional caching controls, so verify the approach against the version used by your project.
4. Use Layouts, Nested Layouts & Templates
For scalability, place reused UI into layouts.
app/
└── dashboard/
    ├── layout.tsx      ← reusable sidebar + header
    ├── analytics/
    │   └── page.tsx
    └── reports/
        └── page.tsx
Example:
export default function DashboardLayout({ children }) {
  return (
    <div className="flex">
      <Sidebar />

      <main className="flex-1">
        {children}
      </main>
    </div>
  );
}
Pages under /dashboard/ can inherit the shared layout, helping you avoid repeating navigation, headers, and other UI across multiple routes.
This approach is particularly useful for dashboards, SaaS applications, account areas, and other applications with shared sections.
5. Build Reusable, Composable Components
Scalable applications rely on small, independent, and reusable components.
Examples include:
- Button
- Card
- Modal
- Chart wrapper
- DataTable
- Form input components
- Skeleton loaders
Organize components like this:
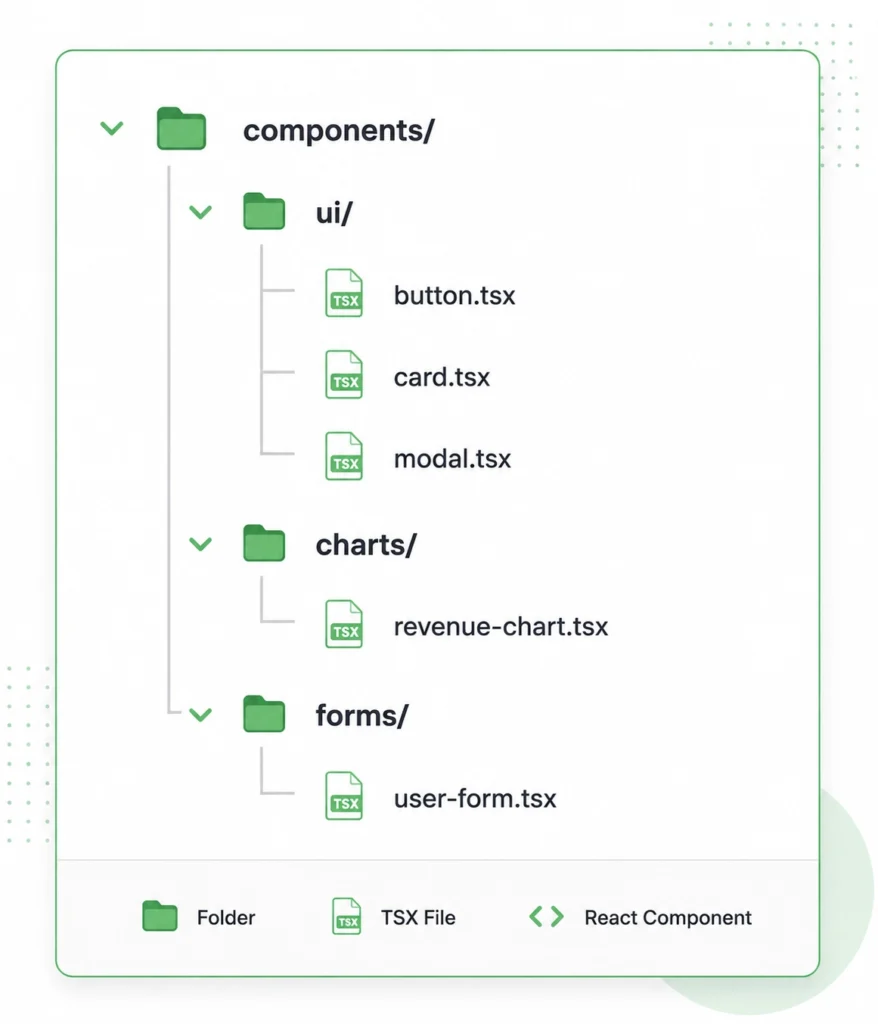
A clean component structure helps avoid repeating UI code across large applications.
A clean reusable Button
export function Button({ children, onClick }) {
  return (
    <button
      className="px-4 py-2 rounded-md bg-black text-white"
      onClick={onClick}
    >
      {children}
    </button>
  );
}
The goal is to create components that are focused, reusable, and easy to maintain without introducing unnecessary abstractions.
6. Handle State Management the Right Way
State should be as local as possible.
Use:
- React state for UI-level state
- Server Components for server-side and asynchronous data
- Zustand or Jotai for global client state when global state is genuinely required
- TanStack Query for client-side data fetching and synchronization when a client-side data layer is needed
- Server Actions for server-side mutations where appropriate
Example Server Action:
"use server";

export async function createPost(formData: FormData) {
  await db.post.create({
    data: { title: formData.get("title") },
  });
}
The key is to avoid making every piece of state global.
Keeping state close to where it is used makes applications easier to understand, debug, and maintain.
7. Use Middleware for Authentication & Role-based Access
In large applications, access management must scale with the rest of the application.
Example Proxy
export function middleware(req) {
  const token = req.cookies.get("token");

  if (!token) {
    return NextResponse.redirect("/login");
  }

  return NextResponse.next();
}
Add role checks with a simple helper:
import { decode } from "jsonwebtoken";

export const getRole = (token) => decode(token)?.role;
For Next.js 16 and later, use the Proxy convention for new implementations.
Proxy can be useful for request-level redirects and access checks, but protected server-side operations should still verify the user’s authentication and permissions.
Security note: Decoding a JWT only reads its payload. It does not verify the token’s signature. In production, authorization decisions should rely on a properly verified session or token.
class CustomButton extends StatelessWidget {
  // Override build()
}
8. Optimize for Performance & Scalability
Next.js provides strong performance features out of the box, but you can go further with deliberate optimization.
Use next/image
Use the next/image component where appropriate for image optimization and responsive delivery.
Enable edge rendering when appropriate
Edge execution can be useful for applications with geographically distributed users, but the decision should be based on the application’s runtime requirements, dependencies, infrastructure, and data location.
Lazy-load heavy components
Large components such as charts and editors can be loaded only when needed.
Example
const Chart = dynamic(() => import("a/components/Chart"), {
  ssr: false,
});
Avoid unnecessary client-side fetching
When data can be securely fetched on the server, avoid moving the same work into the browser without a clear reason.
Split large components
Breaking large components into smaller, focused components can make them easier to maintain and optimize.
Use RSC to minimize unnecessary client-side JavaScript
Using Server Components for server-side work can help keep browser-side JavaScript focused on the interactions that actually require it.
The best optimization strategy should always be guided by measurement. Use tools such as Lighthouse, Core Web Vitals, browser performance tools, and application monitoring to identify actual bottlenecks.
9. Deployment: Use Vercel or Docker for Scalability
Next.js applications can be deployed using managed platforms such as Vercel or through self-hosted infrastructure using Docker and cloud platforms.
Vercel
Vercel provides features such as:
- Automatic CDN delivery
- Edge Functions
- Caching
- Managed deployments
- Integrated scaling capabilities
Docker + Cloud
For applications with specific infrastructure or operational requirements, Docker can be combined with platforms such as:
- AWS ECS
- DigitalOcean
- Kubernetes
You can also add a CDN and reverse proxy layer depending on the architecture.
The right deployment strategy depends on the application’s requirements, infrastructure, team capabilities, and operational constraints. There is no single deployment model that is best for every application.
10. Logging, Monitoring & Error Tracking
As your application grows, observability becomes increasingly important.
Consider integrating tools for:
- Error monitoring: Sentry
- Performance analytics: Vercel Analytics
- Frontend monitoring: LogRocket
- Enterprise telemetry: Datadog
The specific tools can vary depending on the application’s requirements, but the goal remains the same: make it easier to identify errors, understand performance problems, and diagnose issues in production.
Next.js is more than a React framework. It provides a broad set of capabilities for building scalable, reliable, and performant frontend applications.
By focusing on:
- Proper folder structure
- Server Components
- Built-in caching and revalidation
- Layouts and nested layouts
- Reusable UI components
- State management best practices
- Authentication and role-based access
- Performance optimization
- Deployment strategy
- Logging, monitoring, and error tracking
You can build frontend applications that are easier to maintain as your team and product evolve.
Conclusion
Whether you’re building dashboards, SaaS applications, internal tools, or large user-facing platforms, Next.js provides a strong foundation for modern frontend development.
The key to scalability is not simply using every feature the framework provides. It is about choosing the right architecture, boundaries, and tools for the needs of your application.
Looking to build or scale a modern web application? Polygon Technology helps businesses design, develop, and scale reliable software products with experienced engineering teams and modern development practices.
Tags : Frontend Development, JavaScript, Next.js, React, Web Development
We use cookies to ensure that we give you the best experience on our website. If you continue to use this site we will assume that you are happy with it.AcceptPrivacy policy