

Laravel Application Request Lifecycle: A Step-by-Step Guide
Laravel Application Request Lifecycle: A Step-by-Step Guide
Learn how the Laravel request lifecycle works, from public/index.php and application bootstrapping to service providers, middleware, routing, controllers, and responses.
Frontend
September 7, 2026

Zunaid Miah
Software engineer specializing in PHP and Laravel, with a focus on building reliable, scalable web applications and backend systems. His expertise spans application development, API integration, database-driven solutions, and modern software engineering practices. At Polygon Technology, he contributes to developing robust digital products while maintaining clean, maintainable, and efficient code.
Understanding the Laravel application lifecycle is one of the most important steps toward becoming a confident Laravel developer.
Laravel processes a request by bootstrapping the application, loading services, passing the request through middleware, resolving routes, executing application logic, and finally returning a response.
Understanding what happens behind these abstractions can help you:
- Debug issues faster
- Write better middleware
- Understand service providers
- Optimize application performance
- Build scalable applications
Version note: Laravel’s application structure has evolved across major versions. Some of the code examples and file locations in this guide reflect the traditional Laravel structure. If you’re working with Laravel 11, 12, or 13, compare those examples with the current application structure documented by Laravel.
Table of Contents
- High-Level Overview
- Entry Point
- Bootstrap the Application
- HTTP Kernel and Request Handling
- Service Providers Bootstrapping
- Middleware Execution
- Routing
- Controller Execution
- Response Generation
- Response to the Client
- Conclusion
High-Level Overview
At a very high level, the Laravel request lifecycle looks like this:
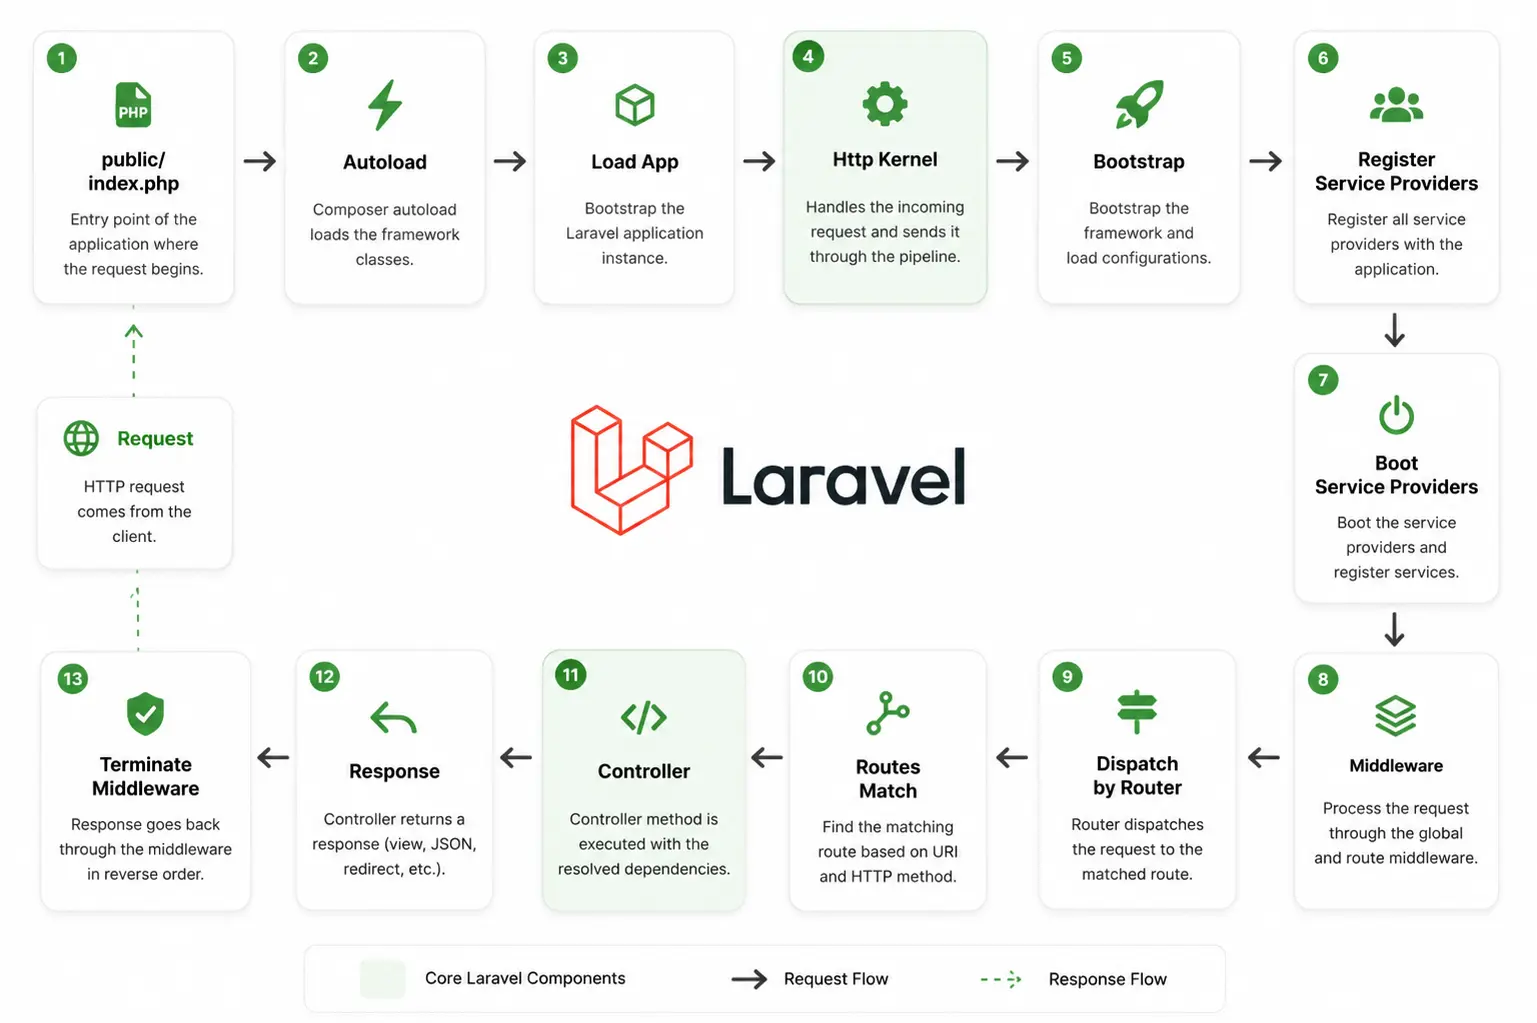
Now let’s break this down step by step, starting from the first file Laravel uses when an HTTP request enters the application.
Step 1: Entry Point
Everything starts when a client, such as a browser, mobile application, or API client, sends an HTTP request to your Laravel application.
The traditional entry point is:
public/index.php
This file is responsible for:
- Loading Composer’s autoloader
- Bootstrapping the Laravel application
- Passing the incoming request into the framework
Key responsibilities:
require __DIR__.'/../vendor/autoload.php';
$app = require_once __DIR__.'/../bootstrap/app.php';
$kernel = $app->make(Http\Kernel::class);
$response = $kernel->handle(
$request = Request::capture()
);
$response->send();
Important
public/index.php does not contain your application’s business logic. Its main purpose is to load the framework and hand control to Laravel.In current Laravel versions, bootstrap/app.php is used to create and configure the application instance before the request is handled. The exact bootstrap code differs from older Laravel versions, so the author’s original code example should be understood in the context of the version it was written for. (Laravel)Using Server Components where appropriate can reduce the amount of JavaScript that needs to be sent to and executed in the browser. The goal is not to eliminate Client Components, but to use them where browser-side functionality is actually required.
Step 2: Bootstrap the Application
Bootstrapping means preparing Laravel to handle the incoming request.
The application is created through:
bootstrap/app.php
At this stage, Laravel creates the application instance and its service container.
The service container is responsible for managing dependencies and resolving the classes and services your application needs.
It helps with:
- Dependency injection
- Resolving services
- Managing bindings
- Managing singletons
You can think of the service container as Laravel’s central mechanism for creating and managing application services.
Step 3: HTTP Kernel and Request Handling
The HTTP kernel is responsible for coordinating HTTP request handling within Laravel’s framework architecture.
In the traditional Laravel structure, the HTTP Kernel was represented by:
app/Http/Kernel.php
The traditional Kernel was responsible for:
- Bootstrapping the framework
- Running global middleware
- Passing the request through the middleware pipeline
- Dispatching the request toward the router
Laravel version note: The application structure changed significantly in Laravel 11. Current Laravel applications configure middleware through bootstrap/app.php rather than relying on the traditional app/Http/Kernel.php structure. The HTTP Kernel concept remains part of Laravel’s request handling, but the configuration surface has changed. (Laravel)
For more details on caching and revalidation, see the Next.js caching and revalidation documentation
Step 4: Service Providers Bootstrapping
Service Providers are at the heart of Laravel’s application bootstrapping process.
They are responsible for registering and bootstrapping services used by the application and the framework.
In current Laravel applications, user-defined service providers are registered through:
bootstrap/providers.php
Laravel’s service providers commonly contain two important methods:
public function register(): void
{
    // Bind services into the service container
}

public function boot(): void
{
    // Bootstrap services after providers have been registered
}
The difference between register() and boot()
register()
Use this method to register bindings and services in the service container.
boot()
Use this method when you need to perform actions after the application’s services have been registered.
A simple rule of thumb is:
register() → bind services
boot() → use registered services
Laravel’s current documentation specifically recommends keeping container bindings in register() and using boot() for logic that depends on services already being registered. (Laravel)
Step 5: Middleware Execution
Middleware acts as a checkpoint layer between an incoming request and your application logic.
It can inspect, modify, reject, or allow a request to continue through the application.
Common examples include:
- Authentication
- CSRF protection
- Logging
- Rate limiting
Middleware can run before the request reaches the controller and can also perform work after the application has generated a response.
The simplified flow looks like this:
Request → Middleware → Application Logic → Middleware → Response
Middleware is particularly useful for cross-cutting concerns, because the same behavior can be applied across multiple routes without duplicating the logic inside individual controllers.
Laravel’s current middleware system supports global middleware, middleware groups, route middleware, aliases, and middleware ordering. (Middleware)
Step 6: Routing
After the request has passed through the relevant middleware, Laravel’s router determines which route should handle it.
For example:
Route::get('/users', [UserController::class, 'index']);Laravel’s router:
- Matches the HTTP method, such as GET or POST
- Matches the requested URI
- Applies route-specific middleware
- Resolves controller dependencies
- Dispatches the request to the matched route
Routes are commonly defined in files such as:
routes/web.php
and:
routes/api.php
The exact routing setup can vary depending on the Laravel application and version.
Step 7: Controller Execution
Once a route has been matched, Laravel resolves the controller and calls the target method.
For example:
public function index(Request $request)
{
    return User::all();
}
Laravel can resolve dependencies through constructor or method injection.
At this stage:
- Application logic is executed
- Models interact with the database
- Services can be called
- Data is prepared for the response
For larger applications, it is generally better to keep controllers focused on coordinating the request and move complex business logic into dedicated services, actions, or domain classes where appropriate.
Step 8: Response Generation
After the controller or route finishes processing the request, Laravel generates a response.
The response might contain:
- A view
- JSON
- A redirect
- A file download
- Another HTTP response type
Examples:
return view('users.index');return response()->json($data);return redirect('/home');Laravel converts the returned value into an HTTP response that can be sent back through the remaining middleware.
Step 9: Response to the Client
Finally, the generated response travels back outward through the relevant middleware.
At this stage:
- Response middleware can inspect or modify the response
- Headers are prepared
- Response content is sent to the client
The simplified flow is:
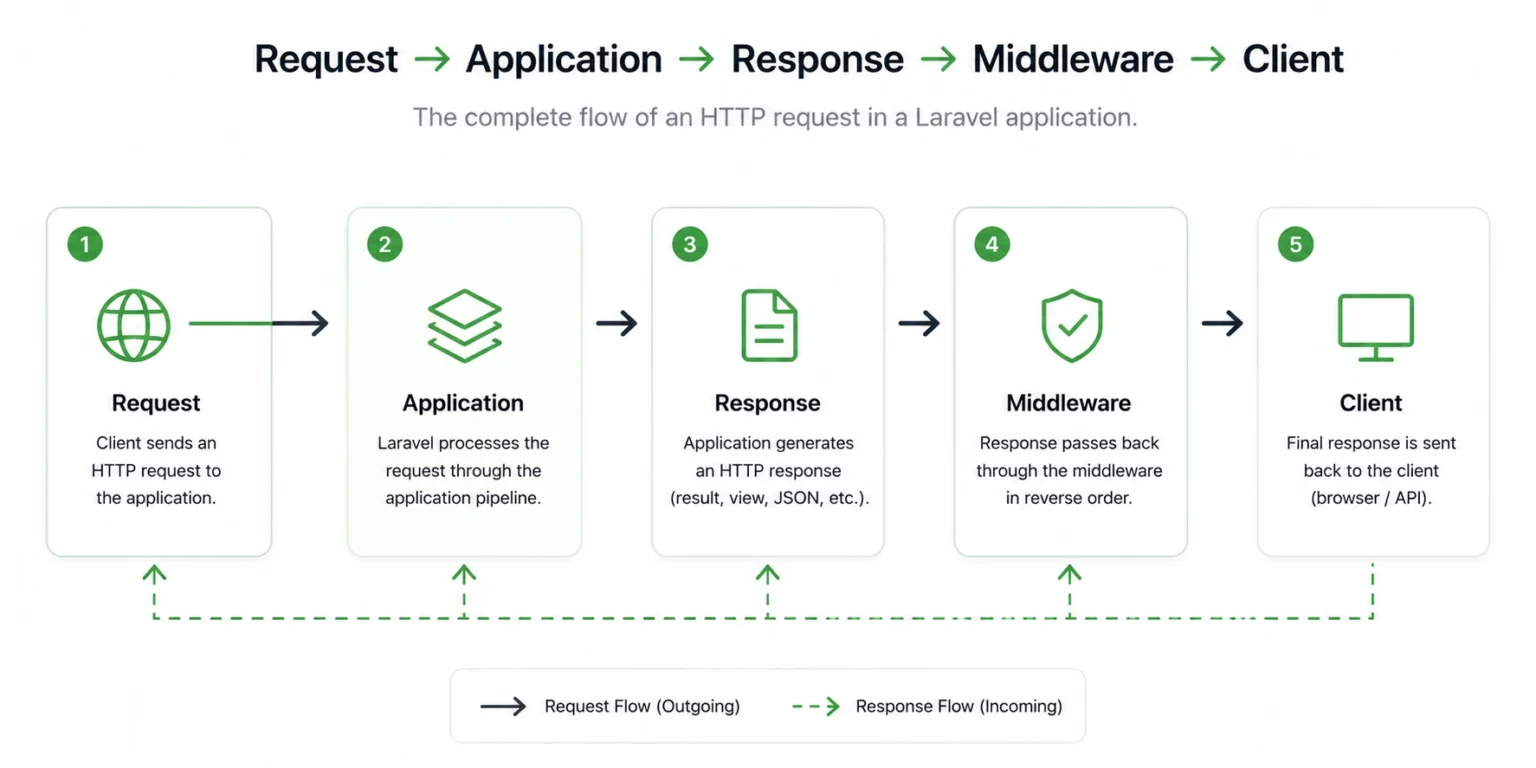
Laravel’s documented lifecycle describes the response traveling back through route middleware before the HTTP response is ultimately sent to the browser. (Request Lifecycle)
And with that, the Laravel request lifecycle is complete.
10. Logging, Monitoring & Error Tracking
As your application grows, observability becomes increasingly important.
Consider integrating tools for:
- Error monitoring: Sentry
- Performance analytics: Vercel Analytics
- Frontend monitoring: LogRocket
- Enterprise telemetry: Datadog
The specific tools can vary depending on the application’s requirements, but the goal remains the same: make it easier to identify errors, understand performance problems, and diagnose issues in production.
Next.js is more than a React framework. It provides a broad set of capabilities for building scalable, reliable, and performant frontend applications.
By focusing on:
- Proper folder structure
- Server Components
- Built-in caching and revalidation
- Layouts and nested layouts
- Reusable UI components
- State management best practices
- Authentication and role-based access
- Performance optimization
- Deployment strategy
- Logging, monitoring, and error tracking
You can build frontend applications that are easier to maintain as your team and product evolve.
Conclusion
Understanding the Laravel request lifecycle makes the framework feel much less like a black box.
From public/index.php and application bootstrapping to service providers, middleware, routing, controllers, and response handling, each stage has a specific responsibility.
By understanding this flow, you can:
- Debug applications more effectively
- Build better middleware
- Understand how services are registered
- Organize application logic more effectively
- Identify performance bottlenecks
- Build more maintainable Laravel applications
The framework handles much of this process for you, but understanding what happens underneath those abstractions gives you a stronger foundation for building and maintaining production applications.
Looking to build or scale a modern Laravel application? Polygon Technology helps businesses design, develop, and scale reliable software products with experienced engineering teams and modern development practices.
We use cookies to ensure that we give you the best experience on our website. If you continue to use this site we will assume that you are happy with it.AcceptPrivacy policy